
I *live* for corny jokes.
Welcome to my SHINY NEW SITE! Is this what it's like to feel like a grown up?
I wrote this post instead of doing homework. College is going great, thank you for asking.
Today's post is about one of my favourite dishes that I was introduced to by my old roommate, TB. (Remember him?) This is his classic, so I've named it after the street we used to live on: Inverness Risotto.
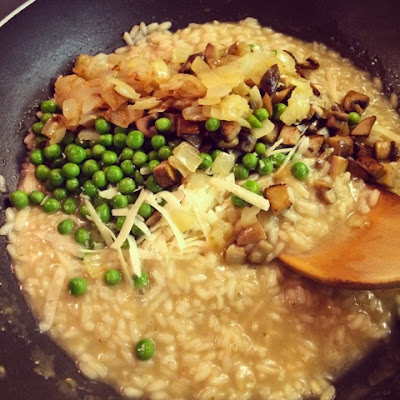
Risotto is awesome. I rarely get to eat it because it's basically just carby indulgence, but it's SO GOOD and there are so many ways to change it up. This recipe is my favorite and the way I remember TB making it most often: just mushrooms, peas, and onions. It's a classic flavour combination and I'm sure you'll love it. If you don't...well, sucks to be you I guess.
Hungry yet?
Risotto is awesome, but it's also time consuming. It needs constant attention, much like a baby or a needy girlfriend, but you can't eat a baby.
You've probably heard before that if you want nice fluffy rice with properly separated grains, you never stir or otherwise disturb the rice when cooking. The exact opposite is true of risotto. That's because stirring rice during cooking releases the starch in the grains, and starch is a thickener--a necessary component for risotto but one that results in goopy rice for other dishes.
The point is, don't assume you can multitask very well whilst making this dish. Fortunately the end result is totally worth it, and to me the constant stirring and monitoring is oddly soothing.

Stretching the definition of science here, but that's as science-y as I feel like getting.
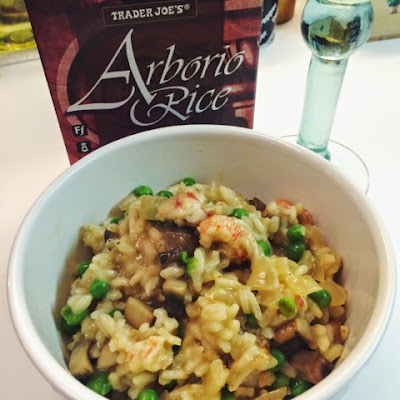
Don't trouble yourselves about the shrimp-looking things in there. That's langosteen, and it's like the middle child between shrimp and lobster (aka it's amazeballs) but it's completely wasted hidden in here. #imessedup
Inverness Risotto
serves 4
What You Need
3 T unsalted butter
1 T olive oil
1 cup Arborio rice
1 cup dry white wine (You know me, it's always Sauvingnon Blanc over here.)
3 cups chicken or vegetable broth
~6 oz baby bella mushrooms, finely diced (I know, that's a dumb measurement and I'm sorry; basically it wound up being 6 mushrooms but it really depends what size they are. Just use your judgement and remember that mushrooms shrink considerably when cooked; risotto is all about proportion between rice and other ingredients.)
1 cup peas, fresh or frozen & thawed
1/2 a yellow onion, finely diced (You could use a shallot instead if you want.)
1/4 cup shredded Parmesan cheese
Zest of 1/2 a lemon
Salt & freshly ground pepper, to taste (Though you probably won't need any salt since most broth is salty enough.)
What You Do
1. So you've lovingly diced up your onion and mushrooms so that they're approximately the size of a pea, yes? (Well, the mushrooms can be slightly bigger since they'll shrink down during cooking, but you get it. You're smart. You also look extra fabulous today, if I may say so. Those pants make your butt look great!) My point is that you want consistency in size for a risotto.
Shit. Where was I.
Okay so in a medium sized deep saucepan or wok (anything you'd do a stir fry in really) over medium heat, melt one tablespoon of the butter. Add the diced onions and cook them until they're soft and translucent and all kinds of golden-brown delicious. Remove them into a bowl and cover to keep warm.
2. Add the second tablespoon of butter, melt, and add the mushrooms, cooking THOSE until they're also kinds of soft and golden-brown delicious. Nom nom nom. Dump those in the same bowl with the onions.
3. Now the fun starts! If you have laundry that needs to go into the dryer or a wine glass that needs to be topped off, now's the time to do that because you're about to set up shop at the stove for about 30 minutes.
The mushrooms will have soaked up the majority of that butter, so go ahead and toss in that final tablespoon of butter along with the tablespoon of olive oil. Once the butter is melted, toss in your dry rice. This is a process called "toasting" and quite frankly it adds such a delicious deep, nutty flavour to rice that I think it should be done before cooking ANY rice dish. But anyway. Stir the rice very often so it doesn't get burned, and after about 3-4 minutes you should be able to smell that lovely nuttiness and see the grains beginning to turn translucent at the very edges.
4. Slowly stir in the wine and turn the heat down to a simmer. Keep stirring. Stir again. Park your ass at that stove and don't expect to go anywhere for the next 20 minutes, because that's what you do with risotto. You stir it and baby it and gently coax all that delicious starch out of those grains and TRUST ME, it is worth it.
5. Wine's all gone? (I mean the wine in the pan, not the one in your hand. I am *sure* that's gone.) Excellent, now time for the chicken broth. Add 1 cup of warm chicken broth, stir, and cook until mostly gone. Repeat with the second cup.
6. When it comes time to add the third cup, toss in your onions, mushrooms, peas, lemon zest, and cheese at this point as well. Keep cooking and stirring (gently now) until about half of the liquid is absorbed (it should still be reasonably creamy), and voila. You have risotto!
Serve as a side dish, or just enjoy an indulgent bowl of carb wonder.
Gobble gobble gobble bitches! If I was some fancy cook I would have done this turkey as a test before Thanksgiving, and posted enough in advance so that you, my faithful followers, could make it yourselves for that happy day of gluttony.
Alas! I am but a poor and busy girl, so go ahead and bookmark this bad boy for your Christmas festivities or for Turkey Day next year. I'm not just saying that because it's *a* turkey recipe, but because: this is the best roasted turkey I have ever had.
(Everyone knows deep fried turkeys are the BEST turkeys, but not everyone wants to mess around with 30 gallons of boiling hot oil.)
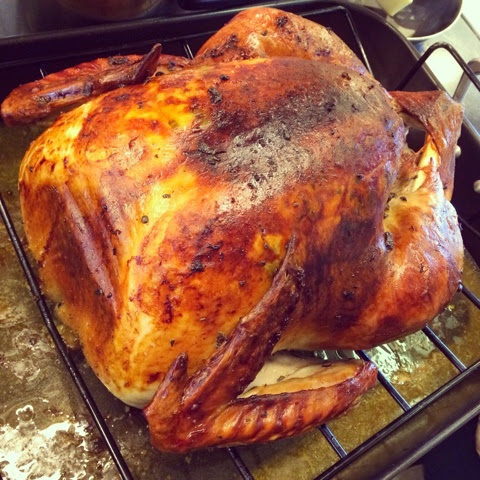
LOOK AT IT!
Like no lie, I'm not meaning to boast because any time something of mine turns out so perfectly I'm 98% convinced it's a fluke, but--THIS IS THE BEST AND MOISTEST, MOST DELICIOUS TURKEY EVER!
Crispy brown skin, check.
Moist, succulent breast meat, check.
The kind of gravy I'd kill for, check.
Hooolllyyyyyyy shit. This one's a game changer.
So! Onwards to it then. This is a long-ass recipe because it covers the whole she-bang from the brine to the gravy and everything in between. The brine is a bit tedious and requires advance planning, but the rest of it is quite simple in execution.
First: To brine or not to brine? That is the question. Well, maybe not, but it's a much better question that that other esoteric bullshit.
~Kidding~, kind of, because Hamlet is my favourite Shakespearean work--but I have to believe that if the good ol' Prince of Denmark knew anything about Thanksgiving turkeys he would definitely be asking MY question instead. So, back to it--to brine or not to brine?
There's copious debate about this on the web and equally so among my friends and fellow home cooks. When informally polled, those who were pro-brining swore by it while others simply brushed it off with a "Meh, not worth it."
Alternatives to the traditional wet brine are a dry brine, a salt crust, or no extra preparation at all save removing the plastic.
This year, since I was cooking Thanksgiving dinner (my first by myself) at my Dad's house which boasts two fridges and the ideal 5 gallon bucket, I figured I would take the opportunity to do a classic wet brine. I'm sure in future years when I'm cooking Thanksgiving dinner in god-knows-what far flung locale, I'll be pressed to try these other more convenient brining methods and indeed, I look forward to it.
Let's get to it cluckers!
LEMON SAGE BUTTER ROASTED TURKEY
serves 4-6 people
WHAT YOU NEED
For the brine:
For the roasting:
Additionally:
For the gravy:
WHAT YOU DO
To Brine:
1. First you gotta brine, about 24 hours before you plan to roast. In a medium sized pot over medium heat, combine the salt, sugar, spices, and lemon juice with enough water to fill almost to the top of your pot. Bring to a low boil and stir until all the salt and sugar is dissolved. Remove from heat and let cool.
2. In the meantime take your turkey out of the fridge, unwrap it in the sink, and remove the neck and giblets and whatever other weird body parts they've stuffed inside there. You can do whatever you want with those since I won't be using them. Rinse the turkey with cold water inside and out, and plop it into your makeshift poultry hot tub.
3. Pour your dissolved mixture over the turkey, along with the beer and lemon quarters, and then fill the bucket the rest of the way with plain water until the turkey is just covered and stir. You may need to weight it down with something to make sure it stays immersed; I found that if I just sort of jammed it in there properly it stuck.
4. Stick that monstrosity in the fridge to chill out for about 24 hours, or until about an hour before you need to roast.
To Roast:
1. Hooray, it's T-Day! Time to get going. About an hour before you need to stick the turkey in the oven (check the packaging directions to find out how long your turkey will need to cook; I had a 13.45 pound turkey and it took about 3 hours and 20 minutes) remove it from the brine and place it on a roasting rack set inside a roasting pan. Pick off any solids like bay leaves and peppercorns and such and throw the brine down the drain. Allow the bird to come to room temperature for about an hour. Chill the hell out about bacteria and whatnot, it'll be fine.
2. Preheat your oven to 450 degrees F. In a small bowl, mash together the butter, lemon zest, lemon juice, sage, and freshly ground pepper. Now here you have to do something kinda gross/mostly cool: run your hands underneath the turkey skin on top to separate it from the breasts. There's a thin sort of membrane that attaches the skin to the flesh and you'll feel it give way as you separate it.
3. Take half the butter mixture in your fingers and insert it in between the skin and the breasts you just separated, rubbing and smoothing it out until the breasts are well covered.
This is sounding a bit suggestive at this point but tbh who doesn't want to be rubbed down with Kerrygold Irish Butter?
Rub the other half of the butter mixture all over the outside of the turkey, in all the crevices like the wings corners and drumsticks.

Like so.
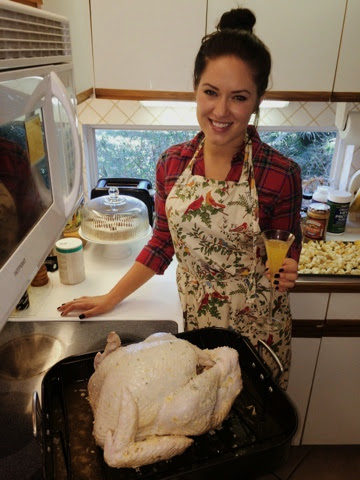
That's my Maple Bourbon Pumpkin Cake chilling behind me, and a mimosa in my hand because it isn't a holiday unless it's started with some bubbly!
4. Woo! All done and time to go in the oven. Last thing you have to do is pour in about 2 cups of chicken stock or broth into the pan so that the drippings won't burn during roasting. Toss that bird (we named ours Dorothy because I'm macabre and weird) into the oven at 450 for only 15 minutes. This blast of heat allows the skin to get a jump start on browning. After 15 minutes, turn the heat down to 350 degrees and set the timer for 1 hour.
5. Somewhere in that hour, melt the additional 1/2 stick of butter and mix with the extra sage and lemon juice. After the timer goes off, remove turkey from oven and baste with pan juices and some of the melted butter mixture. Replace back into the oven, and repeat two more times until turkey registers 160 degrees F when a meat thermometer is inserted into the thigh, or about 2-ish more hours. If you find that the breast is browning too much (at around hour 2 for me) you may gently cover it with a bit of foil.
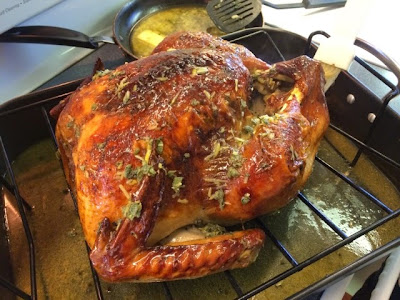
The last baste...look at all that yummy sage and lemon zest! And those pan juices are destined to make a bomb ass gravy.
To Grave
(.......I went with it)
1. Once the turkey is done, remove it to a plate or carving board to relax for about 20 minutes to let the juices disperse throughout. Cover with foil to keep warm. Toss the roasting rack into the sink, and pour off the majority of the fat from the bottom of the pan into a separate heat-safe dish. You can use one of those nifty gravy-fat separators if you want.
That should leave you with just the delicious drippings in the pan. At this point you have the option of cooking the gravy directly in the pan set over two burners; or if you used a nonstick pan like I did, you can just pour all the drippings into another more manageable smaller pot. However if you did NOT use a nonstick pan I DO NOT RECOMMEND THAT! All those browned bits stuck to the bottom will be left behind and they are total flavour bombs. You'll want to include them in your gravy.
2. At any rate, bring the drippings to a rapid simmer and whisk in the flour and water mixture. Whisk constantly and cook for about 4 minutes to thoroughly cook out all the raw flour taste. The gravy should thicken considerably at this point. Then add the wine, and cook for about 8 minutes, whisking often, until most of the alcohol has burned off. Whisk in the water, and TASTE! The salt level at this stage is important. All that salty butter and chicken broth may have provided more than enough salt for your tastes. If the salt level is good, do not add chicken broth and instead simply add more water until your gravy reaches the desired consistency.
Serve over your carved turkey, and I'm sure you will have a very happy table! Bon Appetit!
I'm working hard on sourcing some really cool & unique products for the e-store portion of Lekker & Liquor. Sign up for the mailing list to be alerted when shit gets real!
Previous Posts