Posts tagged #snacks

Lekker: I'M BACK BITCHES! (Also: Classic Shrimp Ceviche)

Wheeeeeee! Hello everyone! It's been so long since I logged into this site that I forgot my password, but DAMN it feels good to be back!

My last post was an announcement of a break I needed to take from the site due to my struggles with severe anxiety and depression. I am *so* pleased to announce that with the new year I seem to have turned a corner in my recovery, and I'm feeling great. Not quite 100% yet, but I'm feeling MUCH more like my usual buoyant, ridiculous, and energetic self with a whole lotta space for adventure this next year.

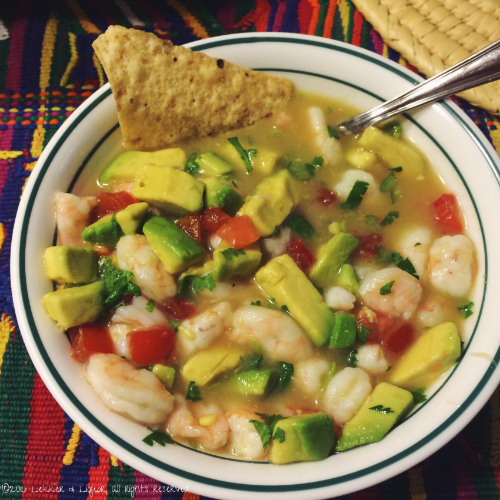
AT ANY RATE, part of feeling like myself again is being excited about delicious food and I have a good one for y'all today. My Dad turned 60 on Friday and to celebrate, my brother and his girlfriend and I threw him a Latin American themed dinner kicking off with a Classic Shrimp Ceviche appetizer.

If you're not familiar with ceviche get ready to try something new because it's absolutely idiot proof (no cooking required!) and quick to throw together. Ceviche is made via the process of using an acid (traditionally lime juice, though I've seen some other recipes use vinegar or other citrus juices as well) to "cook" seafood along with a few additional simple ingredients, served with tortilla chips or warm tortillas.

"But it's not cooked! It's raw seafood, isn't that going to make me sick?!"

Shut up, do you eat sushi? Right, newsflash, that's raw fish, and this isn't even raw fish. The seafood is "cooked" by the acids slowly denaturing the proteins, leaving the seafood with a firm and opaque appearance exactly as if it were cooked by heat.

Tilapia, halibut, and shrimp are common choices for ceviche but personally I find tilapia disgusting since the vast majority is farmed in Asia where the use of chicken feces as a food supply is common practice. Shrimp on the other hand is one of my favourite foods and I find it accessible and easy to work with in a quick ceviche.

So anyway, enough blathering! It's taken me longer to write that intro than it'll take you to actually make this.

Classic Shrimp Ceviche
makes 15-20 servings--though I don't even know how to classify this kind of "serving"--whatever, look this'll very easily serve 6 people as an appetizer, okay?

WHAT YOU NEED
1 pound shrimp, peeled and deveined, tails removed (If you're going to go fresh, make sure they're REALLY fresh--they shouldn't be squishy or smell fishy. It's perfectly okay to go frozen, too, just thaw them completely under cold water before beginning)
1-1.5 cups of freshly squeezed lime juice (DO NOT USE BOTTLED. I will disown you. Make an effort for once you lazy lout.)
1 avocado, diced small
5 or 6 ripe plum tomatoes, diced small
~1/4 cup finely chopped cilantro leaves (no stems)
1/4 teaspoon ground cumin
Salt & pepper, to taste
Optional: 1 green onion, white and light green parts only, thinly sliced
Optional: 1 jalapeno, seeded and chopped, or to taste

WHAT YOU DO
1. Dice the raw shrimp into smallish pieces--don't go nuts, just like, cut one shrimp into three pieces and that's well good enough. Toss them into some non-metal bowl and cover them with the lime juice. The juice should just cover them. Stick them in the fridge and let them marinate for about 3 hours, tossing occasionally.

2. At the 3 hour mark you should notice that the shrimp is opaque and firm. Add in all the other ingredients and toss until very well coated. If you want to add more lime juice, go ahead. Throw it back in the fridge and let it chill out for another hour or so, then serve! I dig serving it with tortilla chips, but you can use whatever you want because this is a free country.

Unless you're reading this from Russia.

LLClassicShrimpCeviche

Cerveza optional but highly advisable.

LLClassicShrimpCeviche2

--Tig

Posted on January 19, 2016 and filed under Lekker.

Lekker: Arugula & Goat Cheese Bruschetta

So, one kind of bruschetta isn't enough for you? My excellent Tomato Basil Bruschetta alone just isn't good enough for you?

Fear not, friends. I'm back today with a second variety of bruschetta you can add to your serving tray, one that was teased in the photo posted in the previous entry.

 See?

So! The second variety is actually called Rocket & Stracchino Bruschetta, with "rocket" being the word for arugula throughout Europe and "stracchino" being the type of Italian cheese we used.

Stracchino, as explained in my blog entry on my separate study abroad blog about the cooking class where this recipe comes from, is a mild white creamy cheese similar to cream cheese. Head Chef Andrea of Cooking Classes in Rome, however, recommends that if you can't find stracchino (which I find highly unlikely to be available in the States) you use goat cheese.

THEREBY...

Arugula & Goat Cheese Bruschetta
serves 4

What You Need
8 slices thick white Italian bread, or anything that can support the weight of being bruschetta
2 large cloves garlic, peeled and sliced in half lengthways
~3-4 T good quality cold pressed extra virgin olive oil
1 bunch fresh arugula (I think you can probably get away with one of the pre-washed bags from the supermarket--you just need enough to do a small heaping on each toast)
a few drops of lemon juice, to taste
salt & pepper
Small log of plain goat cheese, enough to get 8 small rounds out of it, one for each toast

What You Do
1. Grill the slices of bread on your stovetop (or in your oven, or in your toaster) until lightly golden brown and possibly charred in a few spots. You want it to get nice and crispy and dry.

2. Rub one side of each slice of bread with half a clove of raw garlic, just lightly. Then drizzle each slice of bread with a tiny bit of olive oil. Discard the garlic.

3. Finely chop the arugula leaves and dress them lightly with olive oil, a few drops of lemon juice, and salt and pepper to taste.

4. When you're ready to serve, simply pile a bit of the arugula salad on each toast and top with a round of goat cheese (or dollop of stracchino if you were so lucky to get it.) Done!

Lekker: Tomato Basil Bruschetta

Ciao tutti!

Long time, no chat! It's been a busy two months since I last posted, because of Christmas, New year's, and then--moving to Rome, Italy, for five months as part of a study abroad program at my university.

RIGHT????

I started a separate blog to detail these study-abroad adventures called A Broad Travelling, so feel free to go check that out to see what I've been up to. Given that I'm in arguably the world's most amazing country for food, suffice to say I've been eating my equivalent body weight in pasta, pizza, Nutella, gelato, and wine.

Cooking, however, has been a MONUMENTAL challenge. I'm living on campus in a dorm, with no cafeteria and only two regular-sized kitchens (one standard fridge, one small oven, and three oven burners per kitchen) intended to serve the cooking needs of over 140 students. It's frustrating and I miss cooking terribly, but we're doing our best to make it work.

Last week, blessedly, I had the chance to take an actual cooking class here in Rome at the elbow of a true Italian chef, focused on locally sourced and seasonal, sustainable food. (I blathered about it here, with tons more photos.)  I KNOW, THIS IS MY LIFE NOW GUYS. Fortunately for YOU, I have permission to share all those delicious recipes with you here! Thanks, Chef Andrea!

First up is my recipe for some simple, delicious Tomato Basil Bruschetta that I dreamed up years ago--and was thrilled to find out is also Chef Andrea's recipe. It's super simple and can be done largely in advance so you really have no excuse. Buon appetito!

Here, pictured next to a second kind of bruschetta that will also be coming up on the blog in the next few days!

Tomato Basil Bruschetta (a/k/a Bruschetta al Pomodoro e Basilico)
serves 4

What You Need
8 slices think white Italian bread, or any other kind that can answer the call to be bruschetta
4 large Roma tomatoes (though we used round tomatoes on the vine, here called 'Pomodori Colonna')
10-12 leaves fresh basil, roughly torn
1 clove garlic, peeled and crushed into a few big rough pieces
2 additional large cloves garlic, sliced in half lengthways
4 T cold pressed extra virgin olive oil, plus extra for drizzling (since this is a raw dish that involves marinating, it's REALLY important to use a high quality olive oil)
salt and pepper, to taste

What You Do
1. Roughly chop the tomatoes into a small dice (don't worry about removing skin or seeds) and combine in a small bowl with the torn basil leaves, crushed garlic, olive oil, salt and pepper. Toss to combine and leave to marinate out on the counter for at least 30 minutes and up to several hours.

2. Grill the slices of bread on your stovetop (or in your oven, or in your toaster) until lightly golden brown and possibly charred in a few spots. You want it to get nice and crispy and dry.

3. Rub one side of each slice of bread with half a clove of raw garlic, just lightly. Then drizzle each slice of bread with a tiny bit of olive oil.

4. When you're ready to serve, simply compile your tomato-basil topping on top of each slice of toast, and serve. You can fish out the chunks of garlic if you have extra-sensitive guests, but I personally LOVE the spicy kick of garlic so I leave it in. I don't care to kiss anyone that can't get down with garlic, anyway.

Lekker: Feta Dip

Today's recipe comes from Sweet Paul, one that's been hangin' around on my Pinterest boards for ages while I waited for an excuse to whip it up. I got a GREAT one on Saturday night when my girlfriends Lilypad, Tiny Bird, Sammy Anne and I had a good old fashioned girl's night/slumber party--ladies, have you had one of those recently? Now I don't mean going out and getting wasted with your girlfriends and then coming back to crash at their places--I mean sitting around a coffee table laden with snacks on the living room floor, watching romantic comedies and stuffing your faces and laughing until you cry? That's exactly what we did and man, it is good for the heart.

However, since we are "grown ups" (LOL) instead of Ben & Jerry's we had gelato and sorbetto, and in lieu of greasy pizza we whipped up baked Brie and prosciutto and THIS delicious feta dip. I know, we're all just so painfully sophisticated right? Don't worry--I may have been sipping a Lemon Ginger Martini, but I was doing it in a leopard print onesie and making dick jokes through Cards Against Humanity, so, some things never change.

Sidebar: Have you guys ever played that game, Cards Against Humanity? SO. MUCH. FUN. You get to learn aaaaaalll sorts of things about your friends with this little doozy...for example, my sweet, classy, Southern Belle friend Lilypad? Turns into a completely dirty deviant! The hippie, flowers-in-her-braided-hair museum studies/art history major Sammy Anne? That woman just wants to watch the world burn. And Tiny Bird, well...she just wants to play with dead babies and coolers full of organs from Mexico, but I was pretty sure of that already. It's just as despicable, awkward and hilarious as it sounds, and you can buy it here.


Fun way to find out what your friends REALLY think of you, too.

Eat this while you play.

I repurposed the original feta container, because I'm lazy eco-friendly like that.

Feta Dip
serves 4

What You Need
8 ounces feta cheese, crumbled (I am over-the-moon obsessed with the "Authentic Greek Feta" from Trader Joe's, because it IS actually legit--made from sheep's milk and packed in brine, that stuff is utterly addicting.)
1 clove garlic, minced
1 tablespoon grated lemon zest (I only had limes on hand so that's what I used, but lemon is better)
2 tablespoons freshly squeezed lemon juice
Dash or two of dried thyme
Pinch of freshly ground black pepper
6 tablespoons olive oil
Optional: 1 tablespoon Greek yogurt, if you feel like it needs to lighten up a bit

Sliced cucumbers, pita chips, and/or tomatoes for dipping & serving

What You Do
1. Throw everything into a blender or Magic Bullet, or do what I did and just use an immersion blender and a deep bowl. Done! Make sure to let this sit in the fridge for a few hours before you serve it so the flavours have a chance to marry, like half my friends these days.

Posted on February 4, 2014 .

Lekker: Spicy Claussen Knock-Off Pickles

A few weeks ago I attempted pickles for the first time and wound up with some nice (though a little bit too sweet for me) Bread and Butter Pickles. As I raved in that post, though, Claussen Pickles are my absolute favourite because since they are cold brined with no cooking, they are crisp and crunchy unlike the usual sad floppy pickle. (No one likes a floppy pickle, guys.)

I really wanted to figure out how to recreate those at home and looked online for some recipes, but ultimately decided to just wing it on my own. Some people online had trouble with mold, or with "fuzz" appearing at the top of the pickles. My Bonus Dad Harry warned me that he'd heard that garlic goes blue/green when put into vinegar raw, but I didn't have that problem either. It was just easy, and great!

Now, I will say--these are SPICY. These are not like the classic Claussen Dills. Tonight I'm going to change up the vinegar/water ratio (because even for me it was just a tiny bit too vinegar-y, though my girlfriends said they were really good) and tone it down on the red pepper to see if I can get a little bit closer to perfection. That's why I consider this recipe to be a "working recipe", because I will update it as I refine. If you like spicy, though, you will LOVE these--housemate TB absolutely raved, saying he can never find a pickle in the store that is as spicy and crispy as he likes.

I was happy with the way these turned out--they had the crisp crunch I was looking for and I don't see any reason why I would hot brine ever again.

Here we go!
 Pretty pickles in a pretty jar!

Spicy Claussen Knock-Off Pickles (Working Recipe)

What You Need
1 package small pickling cucumbers (these come in packs of six, usually, in a little Styrofoam carton covered in cling wrap)
1 cup white distilled vinegar
1 cup filtered water
1/2 teaspoon red pepper flakes 
1 teaspoon whole black peppercorns
1 teaspoon salt
1/8 teaspoon mustard seed
3-4 garlic cloves, minced roughly
1 handful fresh dill, trimmed of stems (I bought one of those tiny plastic containers of dill in the fresh herb section of the store)

What You Do
1. Wash your cucumbers well and dry. Cut off the stem ends and slice them into spears, then follow the directions for salting them as found in step 1 of the Bread & Butter Pickles recipe. Same concept--we're trying to draw out some of the water to make a crisper pickle.


2. In a large bowl, whisk together the vinegar, water and spices. No heating required!

 Oh, I guess I threw my garlic in there too during this step. Whatever. It isn't rocket surgery peeps.

3. You'll need a large Ball jar or other type of jar with a tight fitting seal for these pickles. I keep forgetting to look what size my jars are because I'm disorganized and have the memory capacity of goldfish. If your 15 minutes of "salting" time for the cukes are up, you can pat them dry nicely with a paper towel and stuff them into the jar along with the minced garlic and the dill. You'll want them to have a LITTLE bit of room to move around so that you can shake up the jar every day.

4. Pour in the brine. For me, I discovered that I was about 2 tablespoons too short of brine because you really want them to be covered completely, so I added some brine from the original Claussen Pickles that I had in my fridge and voila! Put the lid on and tuck them in the fridge for a week. Every day I gave the jar a good shake and turned it upside down to make sure the garlic cloves and spices got nicely distributed.

That's it! My friend Tiny Bird exclaimed "I didn't know you could make your own pickles!" when she tasted them and I didn't know until recently, either, but this is so easy it's stupid. Once I can get this recipe down to my version of perfection I'll ever need to buy pickles again. Not that pickles are, like, insanely expensive or something--I am not making my life easier or cheaper by doing this, but...it's FUN!

This is what they looked like after a week in the fridge. Basically the same, but not so white in color.
Posted on September 17, 2013 .

Lekker: Bread & Butter Pickles

There are lots of reasons why I love to cook, to bake, and to futz around in the kitchen in general.

One is that I love to engage my mind by expanding my skill set and learning new things about flavour combination, technique, and food chemistry.

Two is that I like having a hobby that is productive of something, where I have something to show for it at the end of the day. Creating something (a dish) out of nothing (just "ingredients") to share with others is fulfilling, to me anyway.

Over the weekend I had some time to kill on a gloomy Sunday afternoon and a brand new mandolin that I was just itching to use, so I decided to refer to Reason #1 by attempting homemade pickles for the first time. I like these low-investment experiments because even if I screw it all up, all I've lost is a cucumber and some vinegar, so no tears shed. (Pshh, as if.) Plus, I *LOVE* pickles. Claussen Dill Spears are my all-time favourite; you find them in the refrigerated section because they're not hot brined like most pickles (and this recipe is) so they are suuuuper crunchy and bright and sharp in flavour. I've always asserted that these pickles are the best appetite suppressant out there. I don't know if it's the acidity of the vinegar or what, but whenever I'm feeling like I want to snack for no reason I just chomp on a few of those and I'm satisfied.

This recipe is not for those kind of pickles. Sorry to disappoint after all that raving, but I have no clue how to make those. Blame it on my ADD, baby. THIS recipe, however, is for a basic bread-and-butter type pickle that goes well on sammiches and could be further processed into a BOMB sweet relish. Up to you. You don't need to have a mandolin to make this, as long as you've got a steady hand with a knife and a good eye for making even slices. I, however, find using the mandolin very peaceful and way too much fun to the point that now I'm just looking around my kitchen for things I can slice, julienne, or crinkle cut. (But not my hand; I managed to slice off part of my finger by accident by getting too enthusiastic and misjudging how much room was left between the cucumber and my digits. Oh well. Respawn!)

Don't those feathery fronds looks just so pretty floating around in there? Note how I did not stuff my jar properly. Lesson learned for next time. 

Bread and Butter Pickles

What You Need
1 large English cucumber (those are the long skinny ones in shrink wrap)
2 cups distilled white vinegar
1 cup white granulated sugar
2 teaspoons salt
1/2 teaspoon mustard seed
1/2 teaspoon celery seed
1/8 teaspoon turmeric (sidebar: this spice is a real superfood; sneak it in wherever you can)
1 bunch dill fronds, about 1.5 cups

Righty-o then, here we go.

What You Do
1. First thing to do is prep the veggies. Slice up the cucumbers into pickle-sized slices, whatever that means to you. On a baking sheet lined with paper towels, sprinkle down a layer of salt. Lay the cucumbers down and sprinkle more salt on top. Let sit for about 15 minutes to draw out some of the moisture, then press down with another layer of paper towels to pat them dry.


2. While the cucumbers are sweating it out like a whore in church, you can mix up the brine. In a medium saucepot over medium heat, combine all the other ingredients except the dill fronds and bring to a boil so that the sugar dissolves completely.


3. Stuff your cucumbers into a large glass jar and layer the dill fronds amongst them. I didn't use enough for this batch as you can see so definitely add more since the taste really gets mellowed out by the brine.

Really, stuff the jar full because they'll float and move around and you'll suddenly wind up with more space that you expected.

4. Once the brine comes to a boil, pour it slowly and carefully into the jar. It should come all the way to the top of the jar without much brine left over. If you are panicky about not having enough brine, add another cup of vinegar and another 1/2 cup of sugar in step 2. But really, these are just pickles, there is no reason to get panicky. Seal the jar and stick it in the fridge to...well...pickle! After 24 hours you're good to go. Nom nom.

So like I said, if you want to take it a step further you can drain the pickles and chop them into relish. These got the green light from both housemate TB and I as-is, though I do prefer a less sweet pickle and will therefore continue to tweak this recipe. I'm also going to attempt cold brining to see if I can replicate the crispness of my beloved Claussen Dill Pickles.
Posted on August 27, 2013 .