Posts tagged #side dish

Lekker: Inverness Risotto

I wrote this post instead of doing homework. College is going great, thank you for asking.

Today's post is about one of my favourite dishes that I was introduced to by my old roommate, TB. (Remember him?) This is his classic, so I've named it after the street we used to live on: Inverness Risotto.

Risotto is awesome. I rarely get to eat it because it's basically just carby indulgence, but it's SO GOOD and there are so many ways to change it up. This recipe is my favorite and the way I remember TB making it most often: just mushrooms, peas, and onions. It's a classic flavour combination and I'm sure you'll love it. If you don't...well, sucks to be you I guess.

Hungry yet?

Risotto is awesome, but it's also time consuming. It needs constant attention, much like a baby or a needy girlfriend, but you can't eat a baby.

You've probably heard before that if you want nice fluffy rice with properly separated grains, you never stir or otherwise disturb the rice when cooking. The exact opposite is true of risotto. That's because stirring rice during cooking releases the starch in the grains, and starch is a thickener--a necessary component for risotto but one that results in goopy rice for other dishes.

The point is, don't assume you can multitask very well whilst making this dish. Fortunately the end result is totally worth it, and to me the constant stirring and monitoring is oddly soothing.

Stretching the definition of science here, but that's as science-y as I feel like getting. 

Don't trouble yourselves about the shrimp-looking things in there. That's langosteen, and it's like the middle child between shrimp and lobster (aka it's amazeballs) but it's completely wasted hidden in here. #imessedup

Inverness Risotto
serves 4

What You Need
3 T unsalted butter
1 T olive oil
1 cup Arborio rice
1 cup dry white wine (You know me, it's always Sauvingnon Blanc over here.)
3 cups chicken or vegetable broth
~6 oz baby bella mushrooms, finely diced (I know, that's a dumb measurement and I'm sorry; basically it wound up being 6 mushrooms but it really depends what size they are. Just use your judgement and remember that mushrooms shrink considerably when cooked; risotto is all about proportion between rice and other ingredients.)
1 cup peas, fresh or frozen & thawed
1/2 a yellow onion, finely diced (You could use a shallot instead if you want.)
1/4 cup shredded Parmesan cheese
Zest of 1/2 a lemon
Salt & freshly ground pepper, to taste (Though you probably won't need any salt since most broth is salty enough.)

What You Do
1. So you've lovingly diced up your onion and mushrooms so that they're approximately the size of a pea, yes? (Well, the mushrooms can be slightly bigger since they'll shrink down during cooking, but you get it. You're smart. You also look extra fabulous today, if I may say so. Those pants make your butt look great!) My point is that you want consistency in size for a risotto.

Shit. Where was I.

Okay so in a medium sized deep saucepan or wok (anything you'd do a stir fry in really) over medium heat, melt one tablespoon of the butter. Add the diced onions and cook them until they're soft and translucent and all kinds of golden-brown delicious. Remove them into a bowl and cover to keep warm.

2. Add the second tablespoon of butter, melt, and add the mushrooms, cooking THOSE until they're also kinds of soft and golden-brown delicious. Nom nom nom. Dump those in the same bowl with the onions.

3. Now the fun starts! If you have laundry that needs to go into the dryer or a wine glass that needs to be topped off, now's the time to do that because you're about to set up shop at the stove for about 30 minutes.

The mushrooms will have soaked up the majority of that butter, so go ahead and toss in that final tablespoon of butter along with the tablespoon of olive oil. Once the butter is melted, toss in your dry rice. This is a process called "toasting" and quite frankly it adds such a delicious deep, nutty flavour to rice that I think it should be done before cooking ANY rice dish. But anyway. Stir the rice very often so it doesn't get burned, and after about 3-4 minutes you should be able to smell that lovely nuttiness and see the grains beginning to turn translucent at the very edges.

4. Slowly stir in the wine and turn the heat down to a simmer. Keep stirring. Stir again. Park your ass at that stove and don't expect to go anywhere for the next 20 minutes, because that's what you do with risotto. You stir it and baby it and gently coax all that delicious starch out of those grains and TRUST ME, it is worth it.

5. Wine's all gone? (I mean the wine in the pan, not the one in your hand. I am *sure* that's gone.) Excellent, now time for the chicken broth. Add 1 cup of warm chicken broth, stir, and cook until mostly gone. Repeat with the second cup.

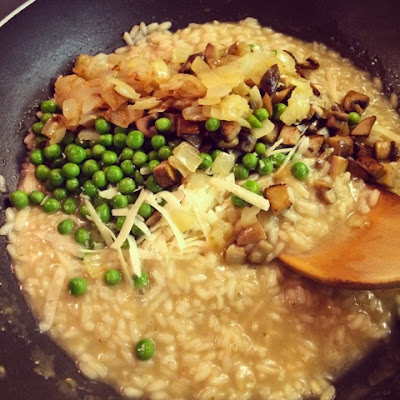
6. When it comes time to add the third cup, toss in your onions, mushrooms, peas, lemon zest, and cheese at this point as well. Keep cooking and stirring (gently now) until about half of the liquid is absorbed (it should still be reasonably creamy), and voila. You have risotto!

Serve as a side dish, or just enjoy an indulgent bowl of carb wonder.

Posted on December 10, 2014 .

Lekker: Mashed Brussels Sprouts

Everyone keeps going on and on about mashed cauliflower as an alternative to mashed potatoes; that crap is like the herpes of Pinterest. Unfortunately for me I've never been able to perfect the recipe--it always turns out too grainy or too watery and exactly 0% "just like mashed potatoes."

Um, excuse me, you are not fooling me. I know mashed potatoes.

I'm not saying they're terribly GREAT for you or anything, being only simple carbohydrates, fat and salt...but isn't that the very definition of a comfort food?

This stuff, though...these mashed Brussels sprouts leave that cauliflower mush in the dust and are so satisfying, and so comforting, I *may* never need to make mashed potatoes again.

Maybe. Let's not get totally out of hand here.

This is really fantastic stuff, though, and if you've already turned your nose at it because it's Brussels sprouts, you need an intervention! Brussels sprouts were brutalised for most of us, I think, with clumsy over-boiling until they were little green balls of sulphuric hell. Roasting baby Brussels brings out a crispy outer texture and sweet nutty overtones, and I'll have a recipe for that soon, but in the meantime, give this bad boy a shot. I'm SURE the concept of mashed Brussels sprouts seems strange, but what's life without a little (or in my case, a great lot) or strangeness? :)

This is the consistency I achieved using only a potato mashed, but if you want it smoother you could run it through with a pair of beaters.

Mashed Brussels Sprouts
serves about 2 as a side dish with a smidge for leftovers

What You Need
1 lb fresh Brussels sprouts (I buy the bag from Trader Joes, but if you can score them straight on the stalk at a farmer's market, by all means snag those! They look so cool, like something you'd see in Doctor Who!)
4-5 tablespoons salted butter, cut into pieces
1/3 cup half-and-half (or more, to adjust the consistency to your liking)
Salt & pepper, to taste

What You Do
1. I think this is even simpler and faster that mashed potatoes. Just wash your Brussels sprouts lightly (if they're fresh, there might still be a bit of sand/dirt on them) and trim the ends off, removing any grubby outer leaves. Slice into quarters, and toss into a steamer basket. If you don't have a steamer basket, GET ONE! It's just a little basket you pop into a pot that will keep your veggies elevated above the inch or so of water you'll put in the bottom. It's MAGIC.

2. Steam just until the sprouts are bright green and fork tender. Lift the steamer basket out, drain the water, and pop the sprouts back into the pot. Add your butter and half-and-half and go to work with a standard potato masher. Add salt and pepper to taste, aaaaand....you're done!

I asked my roommate TB to have a taste to let me know his thoughts. He dipped his spoon in, and was quiet. He dipped his spoon in again. He dipped his spoon in AGAIN...and I wrested the bowl away from him. Yep, "good enough I could eat the whole bowl!"

Lekker: Bacon Braised Collard Greens

As you may recall, I was born and partially raised in South Africa--hence the "SouthAfricanBokkie" tag that shows up here, and elsewhere. "Bokkie" is a South African slang word for "darling" or "sweetie". After my family moved to the States, though, we settled in Florida and I grew up absorbing some of what it is to be a "Southern girl." My best girlfriends Lilypad and Tiny Bird emulate this infinitely more than I ever could, especially Lilypad with her pearl necklaces and sweet, preppy sundresses and sorority sisters, but a few things did stick--sweet tea, church on Sundays (well, sometimes), country music and a STELLAR pair of boots. I've been known to slip into my Southern drawl from time to time, as well, especially when sweet tea vodka is involved!

I was feeling rather in touch with my Southern-girl side this past weekend and craved some good old fashioned comfort food, this time taking the form of these bacon braised collard greens. EVERYONE down South knows how to prepare these 'dam good eats', and now you will, too. 

Oh, and ladies? If you've never dated a true Southern gentleman...FIND ONE. Trust me. Just trust me.

 South African by birth, Southern by the grace of...a green card? Close enough.

Bacon Braised Collard Greens
serves 4

What You Need
1 bag (16 ounces) collard greens, pre-cut and pre-washed because I am lazy and the child of American convenience
8 ounces applewood smoked thick cut bacon, chopped (I used Trader Joe's "Ends and Pieces" since they are the thickest cuts of bacon I can ever find)
1 large onion, sliced
4-5 garlic cloves, minced
1 teaspoon red pepper flakes, plus a pinch more for finishing
1 dash cinnamon (trust me on this)
1 1/2 cups low sodium chicken broth
1/4 cup apple cinder vinegar
S&P, to taste

What You Do
1. In a large pot (collards will wilt way down as they cook, but at first they're pretty huge and you'll want to make sure you have enough room to stuff them all in there) over medium heat, cook the bacon, stirring often, until most of the fat has rendered out and the bacon is crisp. Remove the bacon using a slotted spoon to drain on some paper towels.

2. In all that delicious bacon fat, toss in your onions and cook for about 5 minutes or until they're soft and golden. Add the garlic and cook until fragrant, about a minute or so. Add the red pepper flakes and cinnamon and stir well to combine. Now's the time when you stuff in all those collard greens and stir constantly until they turn bright green and are well immersed with the onions and bacon fat. Turn the heat to low and add the chicken broth. Cover and simmer at a bare simmer for about 15-20 minutes, stirring often.Monitor the liquid content as you go; you don't want it to dry out, but if it's looking too liquidy, just take the cover off to evaporate some.

3. When they're tender to the bite and dark green (and smell AHMAZING), add in the crisped bacon and the vinegar and stir all together to combine. Turn off the heat and let it sit covered for about 5 minutes. I find that the sodium of the bacon and the chicken broth is PLENTY salty, but feel free to taste and adjust at this stage.


I am so mad about these I just want to eat a whole big bowlful for dinner with a couple of slices of toasted, buttered bread--but you can also serve this with those Perfect Mashed Potatoes we talked about, and sausage or two.