Posts tagged #cheese

Lekker: Cheesy Polenta & Collard Greens

Ey yo! Long time no see!

Being back on that college grind means my entire diet has basically been whittled down to the "cheap and healthy" choices of 1) salad and 2) eggs on toast.

That's it.

When I go home and visit my Dad on the weekends, I get crazy and eat some chicken, and drink a beer. It is like a madhouse up in here, y'all.

HOWEVER, this weekend I got the inordinate thrill of actually--gasp--COOKING A MEAL. And it was grand, because I discovered the joys of polenta a few months ago and it is absolutely my new favourite comfort food. In my highly unhumble opinion it's pretty much on par with mashed potatoes when done right, and I think it's the cheesiness that does it.

Polenta is historically a peasant's dish from back in Ye Olde Long Ass Time Ago (around the 16th century if you want to get technical), because essentially it's just cornmeal boiled with water into a porridge. Gruel.

Yeah that's right. I'm teaching you how to make gruel, you filthy Roman slave. 

For the rest of this post, you may envision me this way. Triple bonus points if you actually know who this is.

Anyway, back on track.

A quirk of polenta is that it has a very short "plate life", just FYI. It can sort of gum up fairly quickly, so if you're adding it to part of another meal you want to make sure you've got everything else ready to go before the polenta is finished. It also doesn't reheat really well so don't make more than you need, BUT if you do, next-day polenta can be cut into pieces and either fried or grilled and is REALLY delicious that way.

Don't be put off by that. Don't be lazy. 

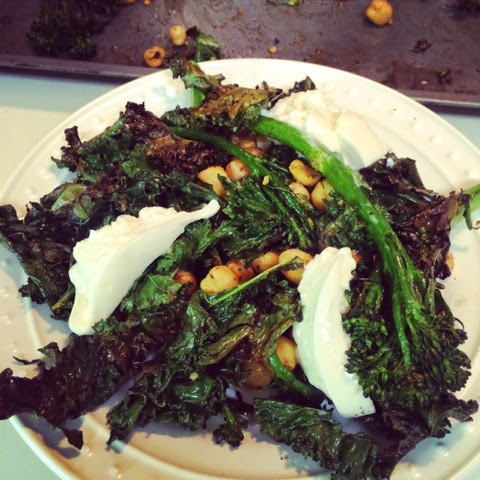
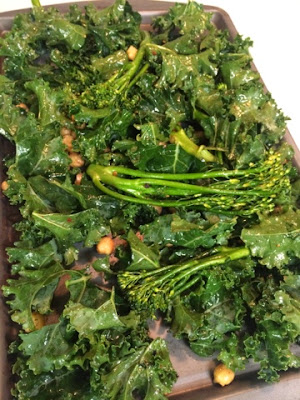
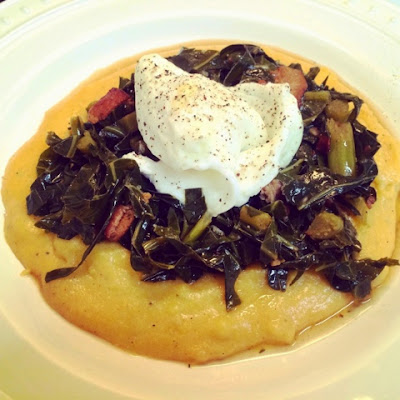
Oh, and one last thing--since polenta is a starch you can pair it with just about anything your heart desires, but I was craving a Southern feel (and bacon was on sale, because there is a God) so I went ahead and mixed up a batch of my Bacon Braised Collard Greens to put on top. And then, of course, a crown of poached egg at the summit of this deliciousness, because if it CAN be topped with an egg, I will do it.


CHEESY POLENTA
serves about 4 Roman slaves if they are skinny, or 2 Roman Slave Lords if you want a bit of leftovers
 

WHAT YOU NEED

  • 3/4 cup fine yellow cornmeal
  • 2 cups chicken broth or stock
  • 1 cup dry white wine (not a sweet one like Moscato or Riesling)
  • 3/4 cup grated sharp white cheddar (Cabot is the shit. Like, bar none the best non-specialty cheddar you can find at the grocery store, IMO.)
  • 1/2 teaspoon paprika
  • fresh cracked pepper
     

WHAT YOU DO

1. It's really easy. In a medium saucepan over medium heat, bring the broth and wine to a rapid simmer. Let simmer for about 6-8 minutes to let the alcohol in the wine cook off. Then slowly sprinkle in the cornmeal, paprika, and a bit of pepper, whisking constantly to avoid any lumps. It'll thicken up immediately and look like bubbling lava. Yummy! Turn the heat down to low, cover, and simmer gently for 15 minutes, stirring often.

2. It should only take about 15 minutes to cook, so at this point stir in the cheese until it's nice and melty. The consistency should be smooth with no lumps. If it's looking too thick for you after the cheese has been added, stir in a little more broth or water to thin it out (I like mine thinner) and serve immediately. 

If you like, you can add some chopped fresh parsley or chives for some pretty colour; I just didn't have any. This recipe is bound to pop up again because there's so many variations I want to try, like...a baked chorizo, egg and polenta breakfast skillet...coming soon! (ish)

Lekker: Warm Roasted Kale, Broccolini & Chickpea Salad with Burrata

Hello hello! Last night I got back into the kitchen after almost a month away from recipe testing and let me tell you, it is SO GOOD FOR MY SOUL. There is absolutely no doubt that this is my passion in life. Cooking brings me so much joy, relaxes me, challenges me, and is the best never-ending entertainment. How fortunate that I picked a passion that is so easily practiced!

On to dinner, then. Everyone in the food world is "over" kale now, though whether it's because it's become too mainstream (cue my "snobby hipster bullshit" alarm) or just because we all got over-saturated with it for awhile I can't be sure.

Personally I can't be bothered with trends (I am still wearing distressed denim and ask me if I care) so *I* still love roasted kale like mad, and since the broccolini was looking so utterly bright green and wonderful in the shop I decided to toss this salad together. It takes about 10 minutes, tops, and manages to be warm, filling, crunchy and creamy all at the same time.

WARM ROASTED KALE & BROCCOLINI SALAD WITH BURRATA
serves 2


WHAT YOU NEED

  • 1 bunch fresh kale torn into large pieces (It looked so hardy and good in the store that I decided to work with whole fresh leaves instead of using the usual pre-washed bagged stuff as I usually do. I think this helped control some of the possible bitterness in kale, and come on, it's not hard to rinse the leaves and tear them into large pieces. Remember that kale, like spinach, cooks down tremendously so err on the side of more rather than less when estimating raw kale.)
  • 8 ounces (about one small bunch) broccolini (If you don't know, broccolini is like baby broccoli. It has longer, more tender stems and larger buds on the "tree tops." I prefer it over regular broccoli for roasting, hands down.)
  • 1 tin chickpeas (aka garbanzo beans, same thing) rinsed and drained
  • salt & pepper
  • red pepper flakes or chili powder, to taste (I used about a teaspoon of chili powder)
  • olive oil for roasting
  • juice of about 1 lemon
  • 4 ounces burrata cheese, roughly sliced (Burrata is a type of mozzarella, but instead of being simply a solid ball of mozzarella it's got this delicious creamy center. It's oozy and rich and melts ever-so-slightly on top of the salad to give you the "necessary" richness for such a *healthy* salad!)


WHAT YOU DO

1. Heat your broiler on high. In a large bowl, toss together the broccolini, torn kale, chickpeas, salt, pepper, and either red pepper flakes or chili powder with a bit of olive oil until just coated. Spread out onto a baking sheet (you might need to use two; don't crowd the pan too much otherwise things won't roast properly) and broil for 6 minutes, tossing once at the 3 minute mark.

Like dis.

2. It'll be done when the kale is just turning brown in spots and the broccolini is bright green. Squeeze the fresh lemon juice over all and top with the sliced burrata. Serve warm.

Lekker: Homemade Feta-ish Cheese

I suppose this recipe is the one that started this blog in the first place, and if I made any sense at all I would have made this the first entry. But whatevs. I tried my hand at this last weekend for the first time on a whim and posted the results to Instagram. My friend Eliza begged for the recipe and gave me the push I needed to start this little thing, so here we are!

I got the idea from a buddy of mine, Lucas, who I'm fairly certain is some sort of international secret agent or former drug lord. Jury's still out; all I know is that he's already retired at age 32 and does nothing all day except cook delicious things whilst drinking and sends me pictures of all of it. Drives me bananas, but he gives me good recipes so we're still friends. This came about because he had picked about a dozen ears of fresh corn from his garden and wondered what to do with them. I suggested a simple roasted corn salad, which calls for feta cheese, and two hours later I get a photo that features a pan of insta-made feta cheese. WHAT?! That's a thing? You can do that?

Apparently.

Farmer Henry shows you how, here, and he's the most adorable farmer I've ever seen.

His video is for making goat's cheese, which obviously uses goat's milk. I didn't have that on hand and Lucas had made it with cow's milk and enjoyed it that way, so I followed his lead. 

I halved the recipe as well since my thighs do not need three cups of cheese sitting in my fridge, so here goes:

Homemade Two Hour "Feta"-ish Cheese
makes about 1.5 cups of cheese

I have "feta" in quotation marks there because this isn't a TRUE feta cheese. It's not brined for a week, and it's not made out of sheep's milk or goat's milk. I did try a second batch with goat's milk, but having done zero research on it I used the only goat's milk I could find at the store which was ultra-pasteurized--which you apparently cannot use. It refused to curdle (stubborn brat) and I wound up throwing it all down the sink. As soon as I can get my hands on some sheep's milk, I will be making this recipe with that--plus experimenting with a brine for a few days. But that's all for later, for now, CHEESE!

What You Need
1/2 gallon whole cow's milk (I used organic)
1/4 cup apple cider vinegar
cheesecloth (which you can usually find in the grocery store by the alu foil and cling wrap; sometimes I think it's called butter muslin and you can use either)
a strainer of some kind 
Optional: olive oil, lemon juice, salt & pepper for seasoning

What You Do
1. Pour the milk into a large non-reactive metal pot (that means no aluminum) on the stove over medium-low heat. You'll need a wooden spoon and a bit of patience for this part, because you're going to have to park your butt at the stove for about 15 minutes to bring that milk to a slow boil. Stir gently and constantly to keep it moving, otherwise you'll scald the milk and it'll taste all weird. Don't be a lazy ass and turn up the heat, it'll get there.


2. As soon as it gets to a boil, turn off the heat and add the 1/4 cup of vinegar and stir gently. This will cause the milk to break and you'll see curds start to form and the liquid around it (called the whey) will go yellow. Give it a minute or two to finish curdling. Looks disgusting at this stage.


3. Now comes time to strain it. You'll need a large bowl with a strainer set up inside it, into which you will lay your cheesecloth nicely. The point is to ladle or pour this mixture into the cheesecloth, which will be supported by the strainer, so the whey can be collected in the bowl. I'd do this in the sink if I were you. You'll then want to gather up the cheesecloth and squeeze more of the liquid out of it. The drier you get it, the firmer your cheese will be.

Yes, that's the strainer from a salad spinner. It's all I had. Don't judge me. Also, this was after I had poured out all the whey, because there was a LOT and nearly made a giant mess on my countertop. Hence the sink suggestion.

4. So at this point, having done more research after the fact, I learned that most cheese makers tie up the cheesecloth into a nice little bundle and hang it from a wooden spoon that's been laid over a bowl so that it can drain further for a few hours. I didn't know this and would have been too impatient anyway, so I just squeezed the hell out of it until it looked like this:

That's the great thing about trying new things in cooking. When you have no idea what you're doing, it's hard to care too much about doing it "perfectly." Wine helps with this.

Hooray! I then dumped it out into a bowl and tasted it. It was kind of bland and I was sort of disappointed until I remembered that Farmer Henry in all his adorable overall-ed glory told me I could season it however I wanted. Feta cheese has a tang, right? So in went salt and pepper, lots of lemon juice and a little bit of extra virgin olive oil, fluffed with a fork until I thought it tasted great.

The olive oil added a bit of colour, but it wasn't actually yellow, those are just my kitchen lights.

I smooshed it all down into a little Pyrex container trying to compact it as much as possible to form nice crumbles and stuck it in the fridge to cool down and firm up for a few hours. In the meantime I poured myself a(nother) celebratory glass of wine and bragged to Lucas and my friend Ghost about my clear supreme excellence in cheese making. (Nevermind the batch of goat's milk cheese I promptly screwed up not 20 minutes later.)

I ate it sprinkled over grilled eggplant and tomatoes for dinner in the evening, and it was awesome. TB is not a huge fan of feta but he tossed it into a stir fry later in the week and gave me two thumbs up. Will absolutely be doing this again, and you should give it a whirl too. It's easy and pretty step-by-step, and who cares if you screw it up? All that's wasted is a half gallon of milk.

Stay tuned for further variations. I refuse to be thwarted in my quest for a magnificently creamy goat cheese bedecked with fresh cut basil from my garden. 

Posted on August 19, 2013 .