Posts tagged #appetizer

Lekker: I'M BACK BITCHES! (Also: Classic Shrimp Ceviche)

Wheeeeeee! Hello everyone! It's been so long since I logged into this site that I forgot my password, but DAMN it feels good to be back!

My last post was an announcement of a break I needed to take from the site due to my struggles with severe anxiety and depression. I am *so* pleased to announce that with the new year I seem to have turned a corner in my recovery, and I'm feeling great. Not quite 100% yet, but I'm feeling MUCH more like my usual buoyant, ridiculous, and energetic self with a whole lotta space for adventure this next year.

AT ANY RATE, part of feeling like myself again is being excited about delicious food and I have a good one for y'all today. My Dad turned 60 on Friday and to celebrate, my brother and his girlfriend and I threw him a Latin American themed dinner kicking off with a Classic Shrimp Ceviche appetizer.

If you're not familiar with ceviche get ready to try something new because it's absolutely idiot proof (no cooking required!) and quick to throw together. Ceviche is made via the process of using an acid (traditionally lime juice, though I've seen some other recipes use vinegar or other citrus juices as well) to "cook" seafood along with a few additional simple ingredients, served with tortilla chips or warm tortillas.

"But it's not cooked! It's raw seafood, isn't that going to make me sick?!"

Shut up, do you eat sushi? Right, newsflash, that's raw fish, and this isn't even raw fish. The seafood is "cooked" by the acids slowly denaturing the proteins, leaving the seafood with a firm and opaque appearance exactly as if it were cooked by heat.

Tilapia, halibut, and shrimp are common choices for ceviche but personally I find tilapia disgusting since the vast majority is farmed in Asia where the use of chicken feces as a food supply is common practice. Shrimp on the other hand is one of my favourite foods and I find it accessible and easy to work with in a quick ceviche.

So anyway, enough blathering! It's taken me longer to write that intro than it'll take you to actually make this.

Classic Shrimp Ceviche
makes 15-20 servings--though I don't even know how to classify this kind of "serving"--whatever, look this'll very easily serve 6 people as an appetizer, okay?

WHAT YOU NEED
1 pound shrimp, peeled and deveined, tails removed (If you're going to go fresh, make sure they're REALLY fresh--they shouldn't be squishy or smell fishy. It's perfectly okay to go frozen, too, just thaw them completely under cold water before beginning)
1-1.5 cups of freshly squeezed lime juice (DO NOT USE BOTTLED. I will disown you. Make an effort for once you lazy lout.)
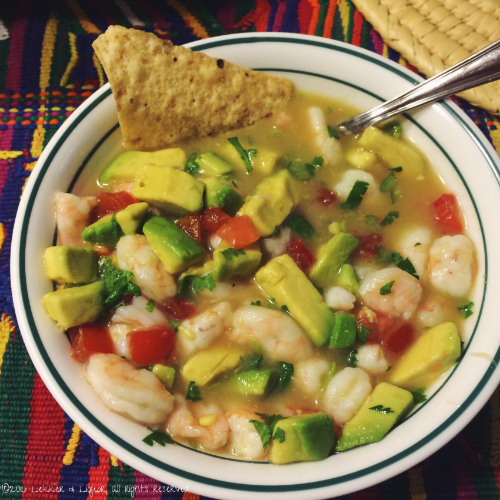
1 avocado, diced small
5 or 6 ripe plum tomatoes, diced small
~1/4 cup finely chopped cilantro leaves (no stems)
1/4 teaspoon ground cumin
Salt & pepper, to taste
Optional: 1 green onion, white and light green parts only, thinly sliced
Optional: 1 jalapeno, seeded and chopped, or to taste

WHAT YOU DO
1. Dice the raw shrimp into smallish pieces--don't go nuts, just like, cut one shrimp into three pieces and that's well good enough. Toss them into some non-metal bowl and cover them with the lime juice. The juice should just cover them. Stick them in the fridge and let them marinate for about 3 hours, tossing occasionally.

2. At the 3 hour mark you should notice that the shrimp is opaque and firm. Add in all the other ingredients and toss until very well coated. If you want to add more lime juice, go ahead. Throw it back in the fridge and let it chill out for another hour or so, then serve! I dig serving it with tortilla chips, but you can use whatever you want because this is a free country.

Unless you're reading this from Russia.

LLClassicShrimpCeviche

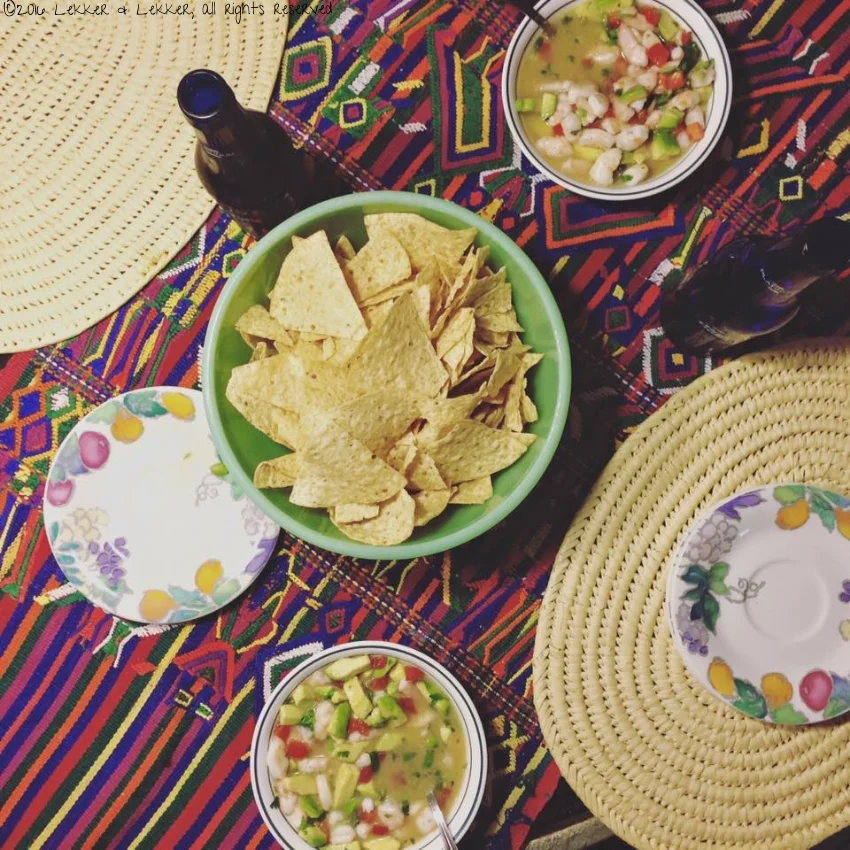
Cerveza optional but highly advisable.

LLClassicShrimpCeviche2

--Tig

Posted on January 19, 2016 and filed under Lekker.

Lekker: Arugula & Goat Cheese Bruschetta

So, one kind of bruschetta isn't enough for you? My excellent Tomato Basil Bruschetta alone just isn't good enough for you?

Fear not, friends. I'm back today with a second variety of bruschetta you can add to your serving tray, one that was teased in the photo posted in the previous entry.

 See?

So! The second variety is actually called Rocket & Stracchino Bruschetta, with "rocket" being the word for arugula throughout Europe and "stracchino" being the type of Italian cheese we used.

Stracchino, as explained in my blog entry on my separate study abroad blog about the cooking class where this recipe comes from, is a mild white creamy cheese similar to cream cheese. Head Chef Andrea of Cooking Classes in Rome, however, recommends that if you can't find stracchino (which I find highly unlikely to be available in the States) you use goat cheese.

THEREBY...

Arugula & Goat Cheese Bruschetta
serves 4

What You Need
8 slices thick white Italian bread, or anything that can support the weight of being bruschetta
2 large cloves garlic, peeled and sliced in half lengthways
~3-4 T good quality cold pressed extra virgin olive oil
1 bunch fresh arugula (I think you can probably get away with one of the pre-washed bags from the supermarket--you just need enough to do a small heaping on each toast)
a few drops of lemon juice, to taste
salt & pepper
Small log of plain goat cheese, enough to get 8 small rounds out of it, one for each toast

What You Do
1. Grill the slices of bread on your stovetop (or in your oven, or in your toaster) until lightly golden brown and possibly charred in a few spots. You want it to get nice and crispy and dry.

2. Rub one side of each slice of bread with half a clove of raw garlic, just lightly. Then drizzle each slice of bread with a tiny bit of olive oil. Discard the garlic.

3. Finely chop the arugula leaves and dress them lightly with olive oil, a few drops of lemon juice, and salt and pepper to taste.

4. When you're ready to serve, simply pile a bit of the arugula salad on each toast and top with a round of goat cheese (or dollop of stracchino if you were so lucky to get it.) Done!

Lekker: Tomato Basil Bruschetta

Ciao tutti!

Long time, no chat! It's been a busy two months since I last posted, because of Christmas, New year's, and then--moving to Rome, Italy, for five months as part of a study abroad program at my university.

RIGHT????

I started a separate blog to detail these study-abroad adventures called A Broad Travelling, so feel free to go check that out to see what I've been up to. Given that I'm in arguably the world's most amazing country for food, suffice to say I've been eating my equivalent body weight in pasta, pizza, Nutella, gelato, and wine.

Cooking, however, has been a MONUMENTAL challenge. I'm living on campus in a dorm, with no cafeteria and only two regular-sized kitchens (one standard fridge, one small oven, and three oven burners per kitchen) intended to serve the cooking needs of over 140 students. It's frustrating and I miss cooking terribly, but we're doing our best to make it work.

Last week, blessedly, I had the chance to take an actual cooking class here in Rome at the elbow of a true Italian chef, focused on locally sourced and seasonal, sustainable food. (I blathered about it here, with tons more photos.)  I KNOW, THIS IS MY LIFE NOW GUYS. Fortunately for YOU, I have permission to share all those delicious recipes with you here! Thanks, Chef Andrea!

First up is my recipe for some simple, delicious Tomato Basil Bruschetta that I dreamed up years ago--and was thrilled to find out is also Chef Andrea's recipe. It's super simple and can be done largely in advance so you really have no excuse. Buon appetito!

Here, pictured next to a second kind of bruschetta that will also be coming up on the blog in the next few days!

Tomato Basil Bruschetta (a/k/a Bruschetta al Pomodoro e Basilico)
serves 4

What You Need
8 slices think white Italian bread, or any other kind that can answer the call to be bruschetta
4 large Roma tomatoes (though we used round tomatoes on the vine, here called 'Pomodori Colonna')
10-12 leaves fresh basil, roughly torn
1 clove garlic, peeled and crushed into a few big rough pieces
2 additional large cloves garlic, sliced in half lengthways
4 T cold pressed extra virgin olive oil, plus extra for drizzling (since this is a raw dish that involves marinating, it's REALLY important to use a high quality olive oil)
salt and pepper, to taste

What You Do
1. Roughly chop the tomatoes into a small dice (don't worry about removing skin or seeds) and combine in a small bowl with the torn basil leaves, crushed garlic, olive oil, salt and pepper. Toss to combine and leave to marinate out on the counter for at least 30 minutes and up to several hours.

2. Grill the slices of bread on your stovetop (or in your oven, or in your toaster) until lightly golden brown and possibly charred in a few spots. You want it to get nice and crispy and dry.

3. Rub one side of each slice of bread with half a clove of raw garlic, just lightly. Then drizzle each slice of bread with a tiny bit of olive oil.

4. When you're ready to serve, simply compile your tomato-basil topping on top of each slice of toast, and serve. You can fish out the chunks of garlic if you have extra-sensitive guests, but I personally LOVE the spicy kick of garlic so I leave it in. I don't care to kiss anyone that can't get down with garlic, anyway.