Posts tagged #lekker

Lekker: Cheesy Polenta & Collard Greens

Ey yo! Long time no see!

Being back on that college grind means my entire diet has basically been whittled down to the "cheap and healthy" choices of 1) salad and 2) eggs on toast.

That's it.

When I go home and visit my Dad on the weekends, I get crazy and eat some chicken, and drink a beer. It is like a madhouse up in here, y'all.
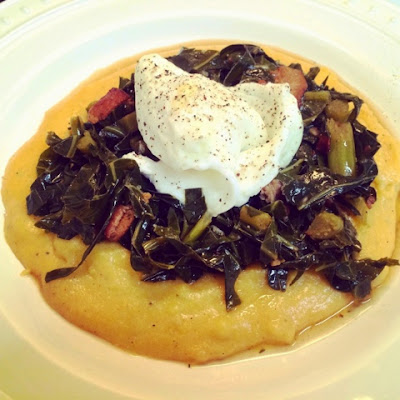
HOWEVER, this weekend I got the inordinate thrill of actually--gasp--COOKING A MEAL. And it was grand, because I discovered the joys of polenta a few months ago and it is absolutely my new favourite comfort food. In my highly unhumble opinion it's pretty much on par with mashed potatoes when done right, and I think it's the cheesiness that does it.

Polenta is historically a peasant's dish from back in Ye Olde Long Ass Time Ago (around the 16th century if you want to get technical), because essentially it's just cornmeal boiled with water into a porridge. Gruel.

Yeah that's right. I'm teaching you how to make gruel, you filthy Roman slave. 

For the rest of this post, you may envision me this way. Triple bonus points if you actually know who this is.

Anyway, back on track.

A quirk of polenta is that it has a very short "plate life", just FYI. It can sort of gum up fairly quickly, so if you're adding it to part of another meal you want to make sure you've got everything else ready to go before the polenta is finished. It also doesn't reheat really well so don't make more than you need, BUT if you do, next-day polenta can be cut into pieces and either fried or grilled and is REALLY delicious that way.

Don't be put off by that. Don't be lazy. 

Oh, and one last thing--since polenta is a starch you can pair it with just about anything your heart desires, but I was craving a Southern feel (and bacon was on sale, because there is a God) so I went ahead and mixed up a batch of my Bacon Braised Collard Greens to put on top. And then, of course, a crown of poached egg at the summit of this deliciousness, because if it CAN be topped with an egg, I will do it.


CHEESY POLENTA
serves about 4 Roman slaves if they are skinny, or 2 Roman Slave Lords if you want a bit of leftovers
 

WHAT YOU NEED

  • 3/4 cup fine yellow cornmeal
  • 2 cups chicken broth or stock
  • 1 cup dry white wine (not a sweet one like Moscato or Riesling)
  • 3/4 cup grated sharp white cheddar (Cabot is the shit. Like, bar none the best non-specialty cheddar you can find at the grocery store, IMO.)
  • 1/2 teaspoon paprika
  • fresh cracked pepper
     

WHAT YOU DO

1. It's really easy. In a medium saucepan over medium heat, bring the broth and wine to a rapid simmer. Let simmer for about 6-8 minutes to let the alcohol in the wine cook off. Then slowly sprinkle in the cornmeal, paprika, and a bit of pepper, whisking constantly to avoid any lumps. It'll thicken up immediately and look like bubbling lava. Yummy! Turn the heat down to low, cover, and simmer gently for 15 minutes, stirring often.

2. It should only take about 15 minutes to cook, so at this point stir in the cheese until it's nice and melty. The consistency should be smooth with no lumps. If it's looking too thick for you after the cheese has been added, stir in a little more broth or water to thin it out (I like mine thinner) and serve immediately. 

If you like, you can add some chopped fresh parsley or chives for some pretty colour; I just didn't have any. This recipe is bound to pop up again because there's so many variations I want to try, like...a baked chorizo, egg and polenta breakfast skillet...coming soon! (ish)

Lekker: Warm Roasted Kale, Broccolini & Chickpea Salad with Burrata

Hello hello! Last night I got back into the kitchen after almost a month away from recipe testing and let me tell you, it is SO GOOD FOR MY SOUL. There is absolutely no doubt that this is my passion in life. Cooking brings me so much joy, relaxes me, challenges me, and is the best never-ending entertainment. How fortunate that I picked a passion that is so easily practiced!

On to dinner, then. Everyone in the food world is "over" kale now, though whether it's because it's become too mainstream (cue my "snobby hipster bullshit" alarm) or just because we all got over-saturated with it for awhile I can't be sure.

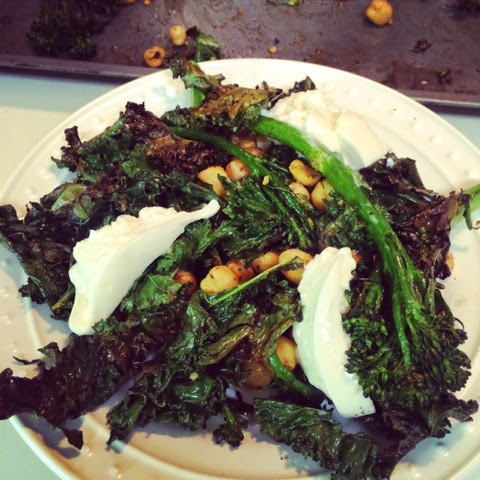
Personally I can't be bothered with trends (I am still wearing distressed denim and ask me if I care) so *I* still love roasted kale like mad, and since the broccolini was looking so utterly bright green and wonderful in the shop I decided to toss this salad together. It takes about 10 minutes, tops, and manages to be warm, filling, crunchy and creamy all at the same time.

WARM ROASTED KALE & BROCCOLINI SALAD WITH BURRATA
serves 2


WHAT YOU NEED

  • 1 bunch fresh kale torn into large pieces (It looked so hardy and good in the store that I decided to work with whole fresh leaves instead of using the usual pre-washed bagged stuff as I usually do. I think this helped control some of the possible bitterness in kale, and come on, it's not hard to rinse the leaves and tear them into large pieces. Remember that kale, like spinach, cooks down tremendously so err on the side of more rather than less when estimating raw kale.)
  • 8 ounces (about one small bunch) broccolini (If you don't know, broccolini is like baby broccoli. It has longer, more tender stems and larger buds on the "tree tops." I prefer it over regular broccoli for roasting, hands down.)
  • 1 tin chickpeas (aka garbanzo beans, same thing) rinsed and drained
  • salt & pepper
  • red pepper flakes or chili powder, to taste (I used about a teaspoon of chili powder)
  • olive oil for roasting
  • juice of about 1 lemon
  • 4 ounces burrata cheese, roughly sliced (Burrata is a type of mozzarella, but instead of being simply a solid ball of mozzarella it's got this delicious creamy center. It's oozy and rich and melts ever-so-slightly on top of the salad to give you the "necessary" richness for such a *healthy* salad!)


WHAT YOU DO

1. Heat your broiler on high. In a large bowl, toss together the broccolini, torn kale, chickpeas, salt, pepper, and either red pepper flakes or chili powder with a bit of olive oil until just coated. Spread out onto a baking sheet (you might need to use two; don't crowd the pan too much otherwise things won't roast properly) and broil for 6 minutes, tossing once at the 3 minute mark.

Like dis.

2. It'll be done when the kale is just turning brown in spots and the broccolini is bright green. Squeeze the fresh lemon juice over all and top with the sliced burrata. Serve warm.

Lekker: Beef Short Rib Ragu

Did you know that the plural of "beef" is BEEVES??? I AM SERIOUS.

Now that that's out of the way, hi! I'm back, tonight with a beef short rib ragu done in the slow cooker than is the absolute definition of comfort food. Turned out to be quite serendipitous that it's snowing like hell here tonight, which somehow justifies "comfort food" even more. It does, though! I'm not even mad about it anymore; it's March 16th (ARE YOU FREAKING KIDDING ME IT IS SPRING BREAK IN MOST PLACES RIGHT NOW OMFGGGGGG) and I've just resigned myself to the fate of living in an icy tundra for the rest of my days.

Anyways. I enjoyed this recipe tonight with my roommates Badger and Bear whilst listening to them bicker about their viability as an Amazing Race team. Kids, let me take all the mystery out of that one for you: one of you is coming home in a body bag.

 Tastes so much better than it looks, I promise!

Short Rib Ragu
serves 4

What You Need
3 pounds beef short ribs, cut into 3-inch pieces (It's unlikely you'll find this kind of thing in your usual grocer; I suggest you find a local butcher who will not only have this cut but will be happy to cut it to the correct specifications as well.)
Preferred oil for frying (canola, vegetable, clarified butter/ghee, etc)
1 large carrot, peeled, halved lengthwise and sliced into 1-inch pieces
1 celery rib, halved lengthwise and sliced into 1-inch pieces
1 medium onion, diced roughly
3 cloves garlic, simply crushed with the flat blade of your knife
1/2 cup red wine (Anything non-sweet that you have on hand will do: Pinot Noir, Merlot, Cab Sav)
1 28-ounce tin whole tomatoes in juice
6-8 stalks fresh oregano
S & P to taste

Serve over these delicious mashed potatoes, though go easy on the half-and-half--you want these to be able to stand up as a sturdy base to the ragu, so you don't want them to be too creamy or soft.

What You Do

1. In a large cast iron or stainless steel skillet, heat the oil over medium-high heat. Sear off the short ribs, working in small batches so as not to crowd the pan (because that's the quickest way to get things steaming instead of frying, no bueno), until well-browned and nicely crusted on both sides. Transfer to a plate and keep working until all the ribs are done.
2. Pour off any excessive fat in the pan, leaving only about a tablespoon. Add the carrot, celery, onion and garlic and turn the heat down to medium-low. Cook, stirring, for about 2 minutes just until the carrots brighten in colour. Add the red wine and stir, scraping up any browned bits left over from the beef. Cook over medium heat until the red wine is mostly absorbed, then remove from heat.
3. Toss the beef and veggies together in a 5-6 quart slow cooker and add the can of tomatoes, breaking up with your hands as you go. (Careful--it's fun squishing them, but they squirt all over the place!) Sprinkle in 4 stalks of fresh oregano and add salt and pepper. Cover, and cook on High for 6 hours.


4. Hollaaaaaa! All done? Okay, if you're ready to eat then get those mashed potatoes going. While they're boiling, you'll want to remove the bones from the slow cooker (the meat should be so tender by now that they're easy to just pick up and remove) and shred the remaining meat with two forks. Add the remaining fresh oregano (fresh herbs lose their power during long cooking so you'll want to boost it up) and taste, adding salt and pepper as necessary. Remember that you're dealing with both beef and tomatoes here, both ingredients that simply cry out to be seasoned with salt.
5. Serve over a pillow of mashed potatoes and a glass of red wine. Hey, you opened a bottle to reduce those vegetables, didn't you? May as well. :)

Lekker: Mashed Brussels Sprouts

Everyone keeps going on and on about mashed cauliflower as an alternative to mashed potatoes; that crap is like the herpes of Pinterest. Unfortunately for me I've never been able to perfect the recipe--it always turns out too grainy or too watery and exactly 0% "just like mashed potatoes."

Um, excuse me, you are not fooling me. I know mashed potatoes.

I'm not saying they're terribly GREAT for you or anything, being only simple carbohydrates, fat and salt...but isn't that the very definition of a comfort food?

This stuff, though...these mashed Brussels sprouts leave that cauliflower mush in the dust and are so satisfying, and so comforting, I *may* never need to make mashed potatoes again.

Maybe. Let's not get totally out of hand here.

This is really fantastic stuff, though, and if you've already turned your nose at it because it's Brussels sprouts, you need an intervention! Brussels sprouts were brutalised for most of us, I think, with clumsy over-boiling until they were little green balls of sulphuric hell. Roasting baby Brussels brings out a crispy outer texture and sweet nutty overtones, and I'll have a recipe for that soon, but in the meantime, give this bad boy a shot. I'm SURE the concept of mashed Brussels sprouts seems strange, but what's life without a little (or in my case, a great lot) or strangeness? :)

This is the consistency I achieved using only a potato mashed, but if you want it smoother you could run it through with a pair of beaters.

Mashed Brussels Sprouts
serves about 2 as a side dish with a smidge for leftovers

What You Need
1 lb fresh Brussels sprouts (I buy the bag from Trader Joes, but if you can score them straight on the stalk at a farmer's market, by all means snag those! They look so cool, like something you'd see in Doctor Who!)
4-5 tablespoons salted butter, cut into pieces
1/3 cup half-and-half (or more, to adjust the consistency to your liking)
Salt & pepper, to taste

What You Do
1. I think this is even simpler and faster that mashed potatoes. Just wash your Brussels sprouts lightly (if they're fresh, there might still be a bit of sand/dirt on them) and trim the ends off, removing any grubby outer leaves. Slice into quarters, and toss into a steamer basket. If you don't have a steamer basket, GET ONE! It's just a little basket you pop into a pot that will keep your veggies elevated above the inch or so of water you'll put in the bottom. It's MAGIC.

2. Steam just until the sprouts are bright green and fork tender. Lift the steamer basket out, drain the water, and pop the sprouts back into the pot. Add your butter and half-and-half and go to work with a standard potato masher. Add salt and pepper to taste, aaaaand....you're done!

I asked my roommate TB to have a taste to let me know his thoughts. He dipped his spoon in, and was quiet. He dipped his spoon in again. He dipped his spoon in AGAIN...and I wrested the bowl away from him. Yep, "good enough I could eat the whole bowl!"

Lekker: Slow Cooker Buffalo Chicken Lettuce Wraps

I haven't actually blogged in awhile because my fingers actually hurt too much to type. It's too cold. I just sat on my hands for a bit to warm them up to write this sentence, and now my butt is just cold. It was 20 degrees when I left the house this morning. My friend Tiny Bird sent me a text message yesterday saying: "I WANT TO BOP THIS COLD WEATHER ON THE HEAD. RAWR."

Winter, we are so done.

We live in DC, by the way, not planet Hoth. This is not acceptable, at least not without a Taun-Taun and a lightsaber (purple, please, with Anakin's handle).

ANYWAYS, today's recipe has nothing to do with the cold or being suitable for the cold or anything even vaguely cutely relating to the cold because there is no rhyme or reason to this blog or my life. I just really really wanted buffalo chicken, and I also really really want to not get fat, so I wrap it in lettuce instead of bread. When feeding my man-friends on football Sundays, though, it's always piled high on top of a toasted buttered Kaiser roll and served with heaps of bleu cheese and pickles on the side.


Buffalo Chicken Lettuce Wraps
serves 4

What You Need
4 skinless boneless chicken breasts (You can also do a mix of breasts and thighs if you're freaky like that concerned about it being too dry, but of course thigh meat has more fat than breast meat and it's all doused in sauce anyway.)
~1.5 bottles of buffalo wing sauce (Yeah I know this is a really inexact measurement, sorry. I always buy two bottles and use about 3/4 of each because I'm never convinced that just ONE brand can have the exact flavour I want. After years of experimenting I've decided that a 50/50 mix of Texas Pete's Extra Mild Buffalo Wing Sauce and Frank's Red Hot Wing Sauce in the classic Buffalo flavour is the perfect mixture.)
2 T butter, chopped into small pieces

To Serve:
Lettuce leaves of choice (Unless your choice is "iceberg" lettuce, because that stuff is a nutritionally empty waste of space on a plate--I recommend Romaine leaves, Boston lettuce, Butter lettuce, or Bibb lettuce. I used Bibb.) 
Bleu cheese dressing (Marie's Chunky Blue Cheese Dressing is the best of the bunch, free of MSG, but you can also make your own by stirring together some blue cheese crumbles and a wee bit of half-and-half, microwaving at 10-second interval until it becomes saucy to your liking!)
Peeled, diced cucumber for crunch (optional; I just really like having pickles with my traditional buffalo chicken sandwiches but didn't think that would be terribly delicious with lettuce, and since pickles ARE cucumbers, it's only logical...)

What You Do
1. Toss the chicken breasts into a slow cooker and dump the sauce on top, turning the chicken around so everything is well coated. Sprinkle the butter bits on top, cover and cook on High for 3-4 hours or on Low for 6-7 hours.

2. Done! Shred the chicken up with two forks and return to the slow cooker to soak up the leftover sauce (feel free to add more at this stage if it's not saucy enough for you) and warm back up. Serve piled on top of lettuce leaves with the condiments and additions of your choice. Done!
Posted on February 28, 2014 .

Lekker: Shrimp & Avocado Salad

I try to be pretty picky about the kinds of recipes I put up on the blog--I cook a LOT, and they aren't all winners. That's why everything I put up here is something I would make again and share with others, but this...this I could eat every day for a month and never complain.

As with most things in life, sometimes the best things are the SIMPLEST things! This Shrimp & Avocado salad is totally brainless, but so refreshing, so light, so delicious, and so applicable. I've eaten shamelessly devoured it by itself, on toasted baguette as an appetizer, on top of crunchy romaine lettuce as an even fuller salad, and even sprinkled with Parmesan in a grilled sandwich. ALL GOOD THINGS. And since I've decided that I am 17 shades of DONE with winter and forcibly moving ahead to summer (if my "bikini body" could get the memo that'd be great), it's extra perfect.

Maybe not the most pristine, photogenic salad in the world, but who cares.

Shrimp & Avocado Salad
usually serves 2 if tossed on top of some chopped romaine lettuce

What You Need
1/2 pound shrimp, peeled, deveined, tail-off and cooked (These particular ones I found at Trader Joe's and all I had to do was run them under some cold water to thaw for 5 minutes and they were DELICIOUS.)
1 avocado, diced
1 large tomato-on-the-vine, or 2 Roma tomatoes, or a large handful of cherry tomatoes, or whatever, diced
1/2 cup peeled and diced cucumber (this wound up being about 1/3 of a large English cucumber)
1 green spring onion, chopped

~2 tablespoons chopped fresh cilantro leaves (no stems)
~1 tablespoon extra virgin olive oil
~1/2 tablespoon fresh squeezed lemon juice (or bottled I guess, but use sparingly since it's often stronger)
2-3 dashes chili powder
S & P, to taste

What You Do
1. Um...toss everything together? Stir really well to combine (the avocado will break down a bit and create a lovely creamy dressing with the EVOO and the lemon juice, but add more if you want to) and let it hang out in the fridge for about 10 minutes so the flavours marry, and...enjoy!
Posted on February 20, 2014 .

Lekker: Bacon Wrapped Baked Eggs

This post is about bacon. That alone should be enough to grab your attention. How about breakfast for dinner? I'm a big fan of that, since my love for eggs is WELL documented, and usually by the time I am home and have had a glass of wine, breakfast is about as complicated as it gets around here! This little dish takes about 30 minutes to whip up start to finish and is fancy enough to do for a Sunday brunch, for a winkwinknudgenudge morning after, or to make yourself feel fancy for dinner. Bottom line: this stuff is the SHIT.

Give it a spin.

Serve with a fresh green salad for lunch, steamed/grilled/sauteed asparagus and feta for dinner, or with some cut fruit and a tall glass of OJ (read: mimosa) for breakfast.

Because bacon.

Bacon Wrapped Baked Eggs
makes 1 serving

What You Need
serves 1; scale up as needed, depending on how many guests you have the morning after--I'm not judging
2 slices bread OR a bit of Pillsbury croissant or biscuit dough (in the pop-open tins that are like jack-in-the-boxes for adults, that is to say, awful)
2 eggs
4 slices of bacon (thick cut, applewood smoked, whatever you like)
Optional: shredded cheddar cheese (yes), sliced scallions or green spring onions (yes), salt and pepper (of course) and/or anything else you like with your eggs.

What You Do
1. Preheat your oven to 375 and grease a muffin tin well. If you're using slices of bread, use a highball glass to stamp out two circles of bread, smooshing them down into the bottom and sides of the muffin tin. You'll want to spray the bread with whatever Pam or melted butter or whatever you used to grease the pan, too. If you're using the croissant dough, just unroll it and layer it on the bottom and sides of the muffin tin. That's stuff got enough grease on its own to be a musical.

 See?

2. Cook the bacon in the microwave until it's pliable but not cooked. Usually this takes only about a minute for me. Wrap two pieces in a "halo" of sorts above the bread, overlapping each other a bit.

3. You can add cheese/onions/herbs to the bottom and then pile the egg on top, or vice versa. Usually I do a bit of both. So, I drop a wee bit of sliced onions and shredded cheese on top of the bread, and crack an egg into that lovely little well you've made. Then top with more cheese, onions, salt and pepper, because you worked hard today putting up with all those idiots out there and you deserve it.

 Voila!

4. YOU'RE DONE. Pop into the oven for about 16 minutes and enjoy a whiskey drink, then remove. Depending on how hot your oven gets you might want to start checking at 14 minutes; take it out when the whites are solid and cooked through. Let it cool for about 3 minutes (this gives the bread and egg time to release itself from the sides of the muffin tin) and run a knife around the edges, popping out onto a warm plate. Serve with your vegetable of choice (to counteract all that whiskey and bacon, of course) and bask in the praise of whomever you've decided to bless with this.

Lekker: Raspberry Chia Jam

Chi-chi-chi-CHIA!

Did I just throw you back? Back to the days of infomercials, before TiVo, back before I discovered my black thumb and I thought I actually stood a chance of keeping one of those things alive? Look, you can even get one of Barack Obama and if THAT isn't just a *shade* on the nose I don't know what is.

Anyway, so apparently chia seeds are a thing OUTSIDE of the infomercial world, even though the red squiggly line underneath it is telling me Blogger disagrees. Shut up, Blogger. People are actually eating it, and as I'm always game to try the latest food trend to see if it's hipster bullshit or actually delicious, I picked some up at Trader Joe's last weekend.

First things first: they are teeny tiny light gray seeds that look like fleas.


I'm sorry, I'm so sorry, but it's TRUE! I figured we could just get that out of the way, dry heave quickly, and move on.

Moving on, the thing that intrigued me most about these flea-seeds when researching them online was their gelatinous properties. That is, if you mix them with a bit of water and let them hang out, the high content of fibre creates a gel-like substance making this a PERFECT substitute for pectin AND gelatin! That is a bizarro and freakin' cool quality, and a big deal for two reasons. (Normal people don't get excited about this kind of thing but I do so bear with me because I'm about to drop some knowledge on you.)

First, pectin. Pectin is the substance that makes jams and marmalades...um...jammy. It's a thickening agent found naturally in the cell walls of plants that makes homemade jams gel to form a nicer spreading consistency.

Second, as a substitute for gelatin, chia is the BOMB. Do you know what gelatin is? It's the stuff in Jell-O and puddings and so on that's derived from collagen. Collagen is the stuff being shot into celebrities faces to make them look younger so that's probably where you've heard about it, but it's naturally found in skin, ligaments, bones, and tendons and you render it out by...boiling it. Seriously, it's true. Jell-O is artificially coloured boiled pig skin and cow skulls. Yummy! Who's hungry?

No, that's disgusting shit and you shouldn't be eating it. You think they make sure the skin is all nice and clean before they boil it? HA HA. If that doesn't sound like some insane Hannibal Lecter type shit to you, then perhaps you deserve what you're eating.

Sidebar: I'm not a fan of things with Jell-o and pudding-like consistency in the first place. It confuses me. I don't know how to eat it. Chew it? Swallow it? Gum it? Smush it through my teeth? No, just no, I prefer my foods to have a more defined identity, thanks. But, for those of you who ARE octogenarians and like that stuff, congratulations! Chia seeds are your new friends.

Back to pectin. I've been tinkering around with jams and marmalades for about two years ever since I spent Boxing Day one holiday with my Dad and friend Brenda trying to make calamondine marmalade. For the life of us none of us could remember/figure out what to use to actually make it JAMMY instead of a runny, sugary mess, and looking back...I have no idea why none of us Google searched it. (I blame the Cinzano day drinking.) Pectin was the answer as we've just learned (were you paying attention?) but since I'm always looking to add nutritional value to anything I make whenever possible, chia seeds STOMP pectin in that department--much like I fervently hope DMX will do to George Zimmerman in short order.

CHIA SEEDS: Fibre! Vitamins! Sustained energy! Superfood! You're not listening anymore and it doesn't matter; here's one way you can introduce it to your diet AND pat yourself on the back for making your own homemade jam. It's so easy and I guarantee it will impress the shit out of your overnight guest when you serve them homemade jam on waffles next-day. See: possible Valentine's Day Morning After breakfast. If you're lucky.


Raspberry Chia Jam
makes about 1/2 to 3/4 cup finished jam

What You Need
1 tablespoon chia seeds
2 1/2 tablespoons water
1 cup raspberries (or blueberries if you want blueberry jam, or blackberries if you want blackberry jam, see how this works?)
2 teaspoons honey or agave nectar, more or less, to your tastes

What You Do
1. In a small bowl, mix the chia seeds with the water and let them sit for about 10 minutes. Then they'll look like this!


2. Then in a blender, Magic Bullet, or in a small bowl using an immersion blender, blend everything together. That's seriously it. No dicing, no cooking, no heat, nothing. NEVER have I had such a cool DIY project with so minimal effort. If only there were someone to impress on Valentine's Day morning.

Gentlemen! Now auditioning.
Posted on February 5, 2014 .